Renaming Instance

How to Change an Instance's Display Name

During instance creation, the "Instance Name" field sets both the hostname and the display name. Both of these can be changed later. This document will only cover how to change the display name. If you need to change the hostname, please follow this guide: How to change an instance's hostname.

Prerequisite

  • Only instances with an Active status can have their display name changed.

An instance with active status

Instuctions

There are three ways to rename an instance:

Method 1: From the Instance List Menu

  1. Click MORE > Rename Instance In the last column for the instance you want to rename, click the MORE button, then select the "Rename Instance" menu.

Choosing instance renaming menu
  1. Enter the desired instance name The "Rename Instance" window will appear. Enter the desired display name in the "new name" field, then click the "rename" button.

Filling new instance name
  1. Verify the new display name Upon successful renaming, a "Renamed Instance" notification will appear, and the instance's display name will be updated as requested.

Success modal
Name was changed successfully

Method 2: From the Instance Detail Page (Location 1)
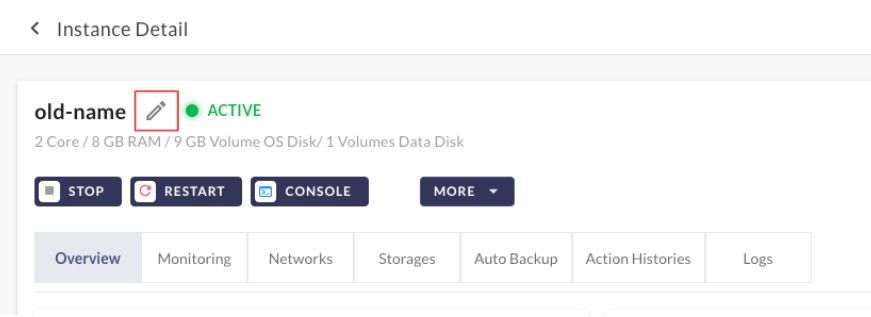
When you click on an instance's name in the instance list, you will be taken to its detail page. From there, you can edit the name as follows:

  1. Click the pencil icon next to the instance name.

Name editing icon
  1. Enter the desired instance name

The "Rename Instance" window will appear. Enter the desired display name in the "new name" input field, then click the "rename" button.

Filling new instance name
  1. Verify the new display name Upon successful renaming, a "Renamed Instance" notification will appear, and the instance's display name will be updated as requested.

Success modal
Name was changed successfully

Method 3: From the Instance Detail Page (Location 2)

Like in Method 2, click on the name of the instance you wish to rename to enter its detail page.

  1. Click MORE > Rename Instance Click the MORE button located under the details section on the instance detail page, and then select the "Rename Instance" menu.

    Choosing instance renaming menu
  2. Enter the desired instance name

The "Rename Instance" window will appear. Enter the desired display name in the "new name" input field, then click the "rename" button.

Filling new instance name
  1. Verify the new display name Upon successful renaming, a "Renamed Instance" notification will appear, and the instance's display name will be updated as requested.

Success modal
Name was changed successfully

Last updated

Was this helpful?