Launching Compute Instance

How to Launch a Compute Instance

Prerequisite

  • Your Project must have a balance greater than 0. If your project has no funds, learn how to add money by following the steps for Topping up a Project's Wallet.

Instructions

1. Enter the Project

Navigate to the project detail page by selecting the desired project from the projects management page.

Project Overview

2. Navigate to the Compute Instance Page

In the left-hand menu, click COMPUTE > Compute Instance to access the Compute Instance list.

Compute Instance list

3. Open the Launch Compute Instance Window

Click the "Compute Instance(s)" button in the top-right corner of the page to open the instance creation window.

launch Compute Instance button

4. Configure Compute Instance Details

Select the following options:

  • Availability Zone: Choose the desired site for the Compute Instance. It is recommended to select the Availability Zone closest to the users of your application to achieve the lowest latency.

  • Quantity: The number of Compute Instances to launch at once. All instances will share the same configuration and will require the creation of new attached components, such as Volumes (which prevents the use of existing Bootable Volumes), Network Ports, and External IPs.

  • Instance Name: The name that will be displayed in NCS and will serve as the hostname for the Compute Instance.

launch Compute Instance - Instance detail

5. Select the Compute Instance Source

The next step is to choose the source, which is the initial data for the Operating System (OS) of the Compute Instance. The options are:

  • Public Image: A selection of standard OS images provided by the system.

  • Custom Image: An image created by the user, either by uploading a Volume or importing from an external source.

  • Bootable Volume: A Volume that already contains an OS. This could be a volume saved after deleting a previous instance or a volume created from a Compute Image.

  • Deployment Script: Launches from a pre-defined base Compute Image and runs a script after the instance boots to install software or apply configurations.

launch Compute Instance - source

5.1 Customize the Deployment Script (if selected)

If you choose "Deployment Script" as the source, you can customize the script. Customizations made at this step will not be saved to the master Deployment Script, making this ideal for setting instance-specific variables like software passwords.

launch Compute Instance - Deployment Script

6. Select the Machine Type

Choose the machine type, or size, of the Compute Instance. You can select a smaller machine type for initial setup and resize it later.

launch Compute Instance - Machine Type

NIPA Cloud Space machine types are categorized into three purposes:

  • Compute Intensive (co): Machine types focused on heavy computation, with a vCPU-to-RAM ratio of 1:2.

  • All Purpose (ap): Machine types for general use, with a vCPU-to-RAM ratio of 1:4.

  • Shared-Core (as): Machine types for general use that do not require constant performance, as

7. Configure Storage

Customize the storage for the Compute Instance:

  • OS Disk: The primary storage where the OS will be installed. This cannot be changed if you are using a Bootable Volume as the source.

  • Data Disk: Additional storage. Multiple Data Disks can be added, detached, or attached at any time.

launch Compute Instance - Storages

While you cannot change the OS Disk or pre-configure Data Disks when using a Bootable Volume, you can always attach additional Data Disks manually after launch.

8. Configure Networking

Set up the network configuration for the Compute Instance:

  • Instance Network: The VPC network, which is private and accessible only within the current project.

  • IP Address: The Internal IP used for communication within the VPC network (e.g., between Compute Instances, Load Balancers, and Database Instances).

  • External Network: The network used for connecting to the public internet.

  • External IP Address: The External IP used for communication with the internet. Using an External IP for internal communication is possible but incurs higher costs and latency compared to using an Internal IP.

launch Compute Instance - Network

When launching more than one instance at a time, you cannot attach pre-existing Internal or External IPs. However, they can be attached manually after the launch.

9. Configure Security

Set up the security settings for the Compute Instance:

  • Security Group: Defines the instance's firewall, allowing only specified protocols and ports.

  • Authentication:

    • User/Password: Access the instance using a password (for Windows and Linux).

    • Key Pairs: Access the instance using a key pair (for Linux-based OS only).

    • Key Pairs & User/Password: Access the instance using either a key pair or a password (for Linux-based OS only).

    • Image Preference: Use the authentication method embedded in a custom imported image.

launch Compute Instance - Security

10. Review Instance Configuration
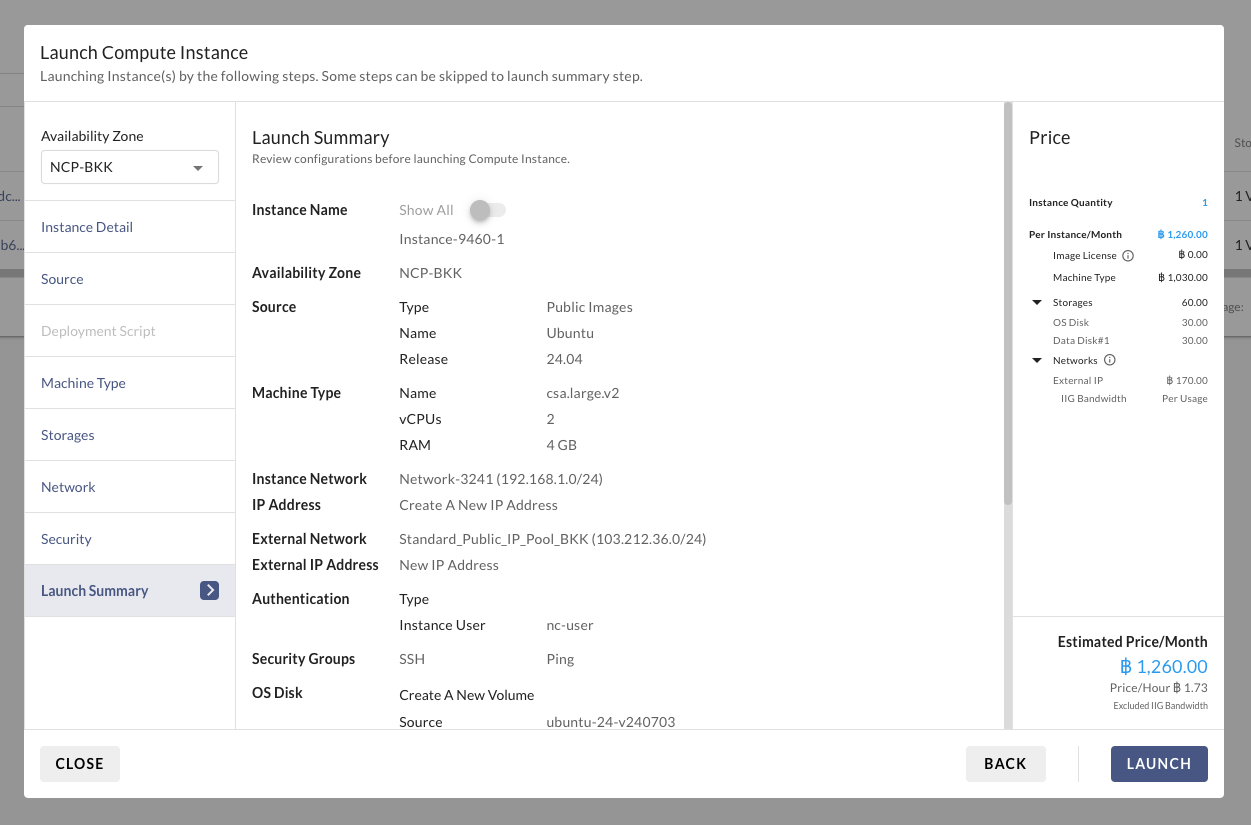
Review all settings for the new instance. If any settings are incorrect, you can go back and edit them. Once you have confirmed the configuration, click the "LAUNCH" button.

launch Compute Instance - launch summary
launch Compute Instance - success

9. Wait for the Instance to Become Active
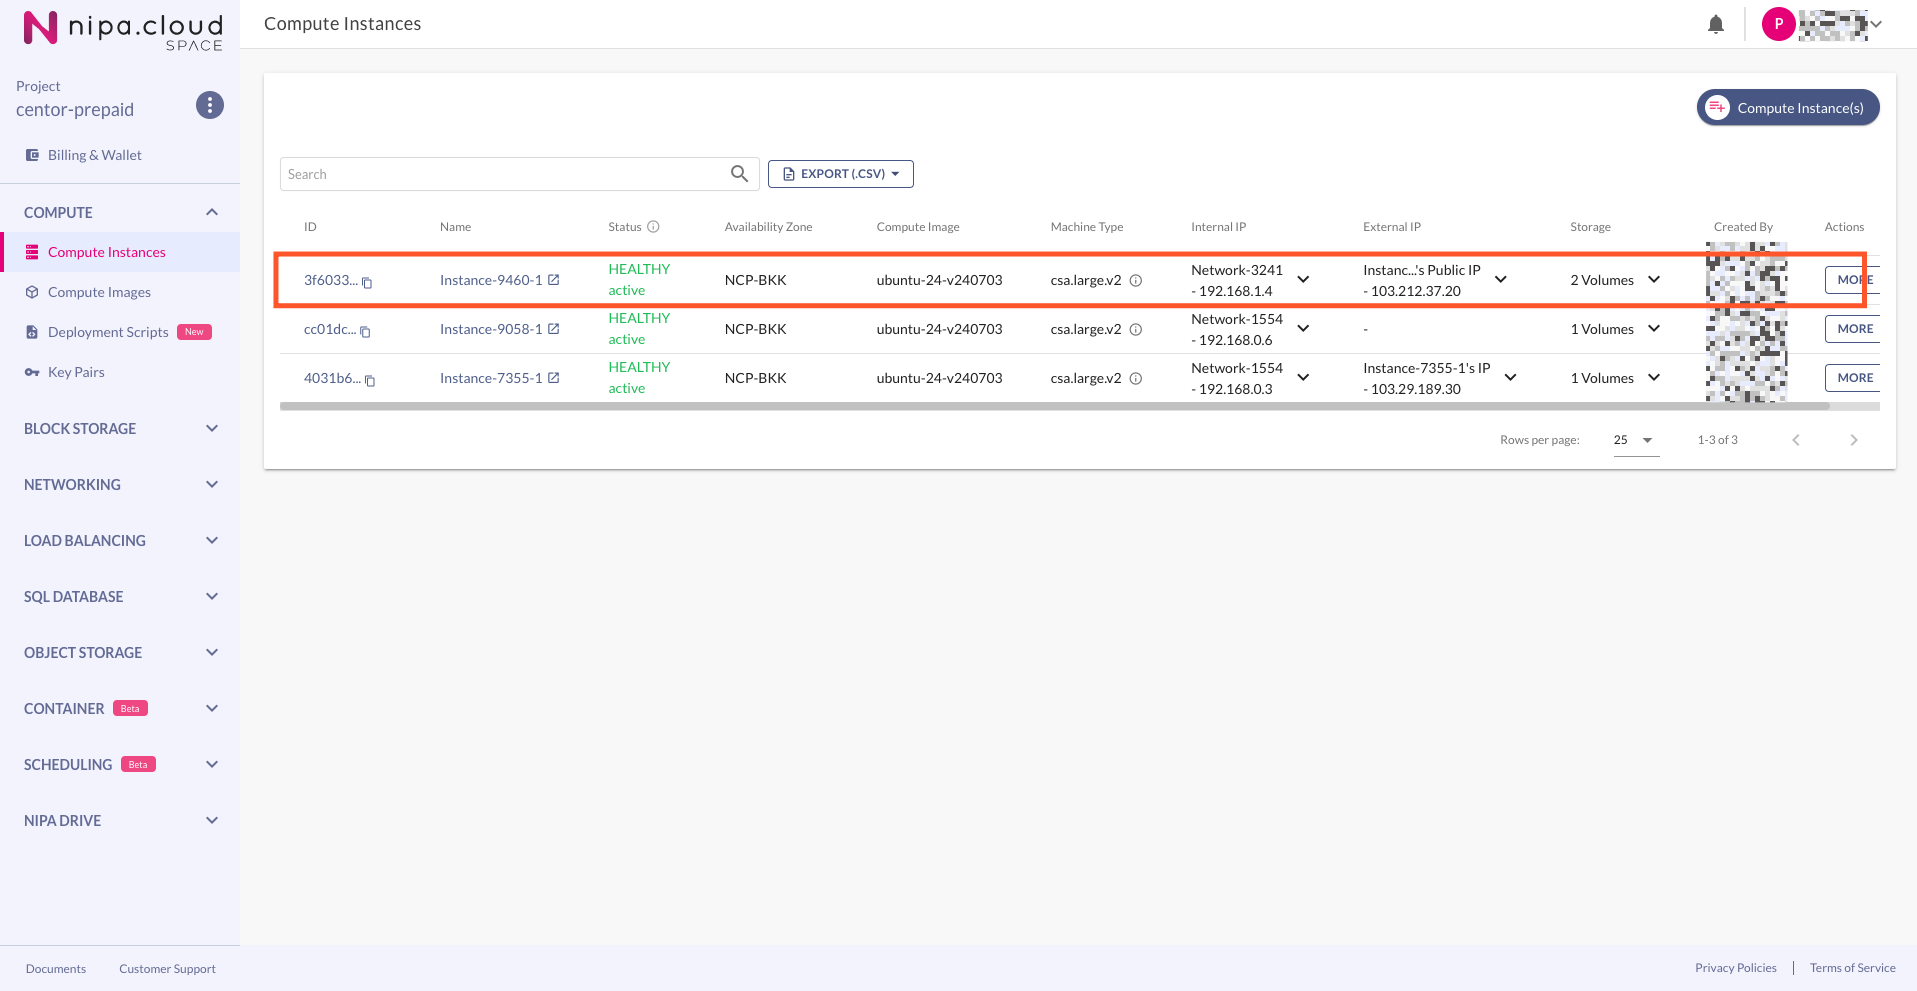
After the launch, wait for the Compute Instance status to become active and the OS status to become HEALTHY. You can then connect to the instance via SSH or RDP.

Compute Instance list - launch completed

The time required to launch the instance depends on the type and size of the selected Compute Image.

Last updated

Was this helpful?