> For the complete documentation index, see [llms.txt](https://docs-epc.gitbook.io/ncs-documents/llms.txt). Markdown versions of documentation pages are available by appending `.md` to page URLs; this page is available as [Markdown](https://docs-epc.gitbook.io/ncs-documents/tutorial/install-rancher-server-with-docker-quick-start.md).
# Install Rancher Server with Docker Quick Start
บทความนี้จะกล่าวถึงการติดตั้ง Rancher Server ประเภท Single Node ด้วย Docker บน Instance ที่ทำงานอยู่บน Nipa Cloud Space แบบกระชับ
## Prerequisite
1. Instance ทั้งหมดใช้ Image "Ubuntu 22.04"
2. Rancher Image ใช้เป็น rancher/rancher ที่มี tag ชื่อ stable หรือ rancher/rancher:stable
3. Linux Host ที่ถูก Deploy อยู่บน NCS วิธีการ Deploy Instance นั้นสามารถ [ดูเพิ่มเติมได้ที่นี่](https://docs-epc.gitbook.io/ncs-documents/instance/launching-instance-s)
4. Instance จำเป็นต้องมี Floating IP Address เพื่อให้สามารถเชื่อมต่อไปยัง Internet ได้ ซึ่งจะใช้สำหรับการ Pull Docker Image มาจาก Container Registry
## Instructions
1. SSH หรือ Console ไปยัง Instance ปลายทางที่ต้องการติดตั้ง Rancher Server โดยวิธีการ SSH ไปยัง Instance นั้นสามารถ [ดูเพิ่มเติมได้ที่นี่](https://docs-epc.gitbook.io/ncs-documents/instance/ssh-to-linux-instance)
```
ssh nc-user@instance-ip-address
```
ด้วยวิธีการนี้จะใช้ SSL Option แบบ Self-signed Certificate ที่ Rancher เองนั้นสร้างมาให้ โดยสามารถพิมพ์ command ด้านล่างนี้ลงบน Terminal ของ Linux Host ได้เลย
```
docker run -d --restart=unless-stopped \
-p 80:80 -p 443:443 \
--privileged \
rancher/rancher:stable
```
> สาเหตุที่ต้องใส่ `--privileged` เนื่องจาก Privileged Mode จำเป็นสำหรับการ Deploy Rancher Server บน Docker Container
2. สำหรับการใช้งาน Rancher Dashboard จากภายนอก Instance นั้นให้เพิ่ม Security Group ที่มีการอนุญาตให้ HTTPS (Port 443) และ HTTP (Port 80) เพื่อให้สามารถเรียกใช้ผ่าน Browser จากคอมพิวเตอร์ส่วนตัวของคุณได้
 3. สามารถเข้าใช้งาน Rancher Dashboard ผ่าน ในกรณีที่เข้าผ่าน Browser จาก Desktop ของ Instance เองหรือผ่าน Floating IP Address ของ Instance ที่ Deploy อยู่บน NCS ได้หลังจากเสร็จสิ้นขั้นตอนที่ 2 โดยอาจจะใช้ระยะเวลาสักพักหนึ่งเพื่อให้ Rancher Server เตรียมความพร้อมก่อนที่จะเข้าใช้งาน Rancher Dashboard ได้
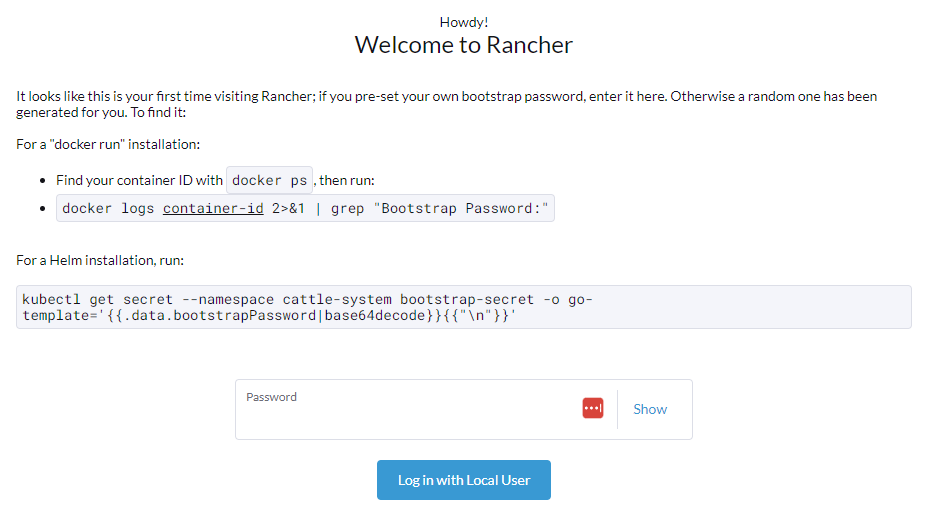
4. การใช้งานผ่าน Browser ครั้งแรกนั้น Rancher Dashboard จะมีการถามถึง Password ของ Admin User ที่ถูกสุ่มมาในระหว่างที่ Rancher Server กำลังจัดเตรียมความพร้อมในครั้งแรกหลังจากพิมพ์คำสั่ง `docker run` โดยคุณสามารถตามหา Password ที่ถูกสุ่มมาครั้งแรกได้จากขั้นตอนต่อไป
3. สามารถเข้าใช้งาน Rancher Dashboard ผ่าน ในกรณีที่เข้าผ่าน Browser จาก Desktop ของ Instance เองหรือผ่าน Floating IP Address ของ Instance ที่ Deploy อยู่บน NCS ได้หลังจากเสร็จสิ้นขั้นตอนที่ 2 โดยอาจจะใช้ระยะเวลาสักพักหนึ่งเพื่อให้ Rancher Server เตรียมความพร้อมก่อนที่จะเข้าใช้งาน Rancher Dashboard ได้
4. การใช้งานผ่าน Browser ครั้งแรกนั้น Rancher Dashboard จะมีการถามถึง Password ของ Admin User ที่ถูกสุ่มมาในระหว่างที่ Rancher Server กำลังจัดเตรียมความพร้อมในครั้งแรกหลังจากพิมพ์คำสั่ง `docker run` โดยคุณสามารถตามหา Password ที่ถูกสุ่มมาครั้งแรกได้จากขั้นตอนต่อไป
 5. ตามหา Container ID ของ Rancher Server โดยใช้คำสั่ง
```
docker ps
```
6. หลังจากนั้นจะเป็นการค้นหา Password ครั้งแรก จาก Log ของ Rancher Server Container โดยให้แทน container-id โดยนำวงเล็บ "\[ ]" ทั้งสองออก โดยคำสั่ง
```
docker logs [container-id] 2>&1 | grep "Bootstrap Password:"
```
5. ตามหา Container ID ของ Rancher Server โดยใช้คำสั่ง
```
docker ps
```
6. หลังจากนั้นจะเป็นการค้นหา Password ครั้งแรก จาก Log ของ Rancher Server Container โดยให้แทน container-id โดยนำวงเล็บ "\[ ]" ทั้งสองออก โดยคำสั่ง
```
docker logs [container-id] 2>&1 | grep "Bootstrap Password:"
```
 7. เมื่อได้ Password จากขั้นตอนที่แล้วให้นำมาใส่ในช่อง Password ตามรูปประกอบด้านล่าง เพื่อเป็นการเข้าสู่ระบบครั้งแรก หลังจากนั้น ระบบจะนำคุณไปสู่การตั้งค่ารหัสผ่านใหม่ สิ่งแรกคือต้องเลือกเป็น "Set a Specific Password to Use" โดยให้กรอกรหัสผ่านใหม่ที่ช่อง Password และ Confirm New Password และกดเครื่องหมายถูกที่ช่อง "By checking the box, you accept the End User License Agreement & Terms & Conditions" เพื่อยอมรับข้อกำหนด
 8. เมื่อกด Continue แล้ว ระบบจะนำคุณไปที่หน้าหลักของ Rancher Dashboard เป็นอันเสร็จสิ้นการเข้าใช้งาน Rancher Dashboard
 > User Interface ที่คุณใช้จริงอาจแตกต่างจากรูปในบทความซึ่งอาจเกิดจากการใช้ Rancher Server ที่ต่างเวอร์ชั่นกัน❗
{% hint style="info" %}
#### วิธีการสร้าง Kubernetes Cluster ผ่าน Rancher Dashboard [ดูเพิ่มเติมได้ที่นี่](/ncs-documents/tutorial/install-rancher-server-with-docker-quick-start/create-rke2-cluster-via-rancher-dashboard.md)
{% endhint %}
***
ข้อมูลเพิ่มเติมเกี่ยวกับการติดตั้งและใช้งาน Rancher นั้นสามารถ [ดูเพิ่มเติมได้ที่นี่](https://ranchermanager.docs.rancher.com/)
> User Interface ที่คุณใช้จริงอาจแตกต่างจากรูปในบทความซึ่งอาจเกิดจากการใช้ Rancher Server ที่ต่างเวอร์ชั่นกัน❗
{% hint style="info" %}
#### วิธีการสร้าง Kubernetes Cluster ผ่าน Rancher Dashboard [ดูเพิ่มเติมได้ที่นี่](/ncs-documents/tutorial/install-rancher-server-with-docker-quick-start/create-rke2-cluster-via-rancher-dashboard.md)
{% endhint %}
***
ข้อมูลเพิ่มเติมเกี่ยวกับการติดตั้งและใช้งาน Rancher นั้นสามารถ [ดูเพิ่มเติมได้ที่นี่](https://ranchermanager.docs.rancher.com/)